Tuesday 24 April 2018

2D Walk Cycles - Week 10


Made this 8 step walk cycle with Rhys. We then added extra appendages to experiment with follow through to further emphasise the bounciness of the walk.


I then made another walk cycle using traditional animation methods:
Things I liked:

  • The lumbering feel of the walk accentuated by the snout swaying and how it makes it feel 3D
  • The fluidity of doing it at 24fps on ones


Things that could be improved:

  • The shoulder placement is not constant/doesn't follow an arc
  • The snout's perspective messes with its length
Although this walk cycles seems to work, I am not happy with it...


I then used Adobe Animate and After Effects to make this:


Things I liked:

  • The timing of the walk (the slowing down of the arms in the in-between pose) gives it a low gravity feel
  • The lankiness of the limbs emphasises the relaxed walk


Things that could be improved:

  • The background and walking speeds don't match perfectly
  • The neck's length changes slightly


Sunday 22 April 2018

3D walk cycle

Experimental Moom walk-cycle


I tried to make an angry stomp on Maya using Moom.


Things I liked:

  • the camera angle,
  • the stretch of the legs

Things I feel need more work:

  • The weight as the foot hits the ground

This was made before the walk-cycle session, so the next step is to incorporate what I learnt into this


Speeding up Rendering Time

After reading a few tutorials online I tried rendering out an improved walk cycle on two computers; 50 frames on each, to speed up rendering time. I didn't add cameras in my project so the outputs had different perspectives. It resulted in this zooming in and out:


Finally I made:


Animatic Submission for D&AD - Week 9


My submission for D&AD;

What worked well:
  • The pacing and timing of the action
  • The slapstick comedy


What could be improved: 
  • The angry pacing walk cycle doesn't bounce enough/ the legs change length


After the submission, I learnt how to make scenes come to life, using lighting. I learnt how to make overlay and multiply layers. This complicated my process, but I feel the outcome was worth it. 
I created backgrounds in Adobe Photoshop and the character animation in Adobe Animate CC which I'm fairly comfortable using.
The two were put together in Adobe After Effects, which helped with camera transitions and movements, and the sound was added in Adobe Premiere Pro. These two I'm not so comfortable with. 
I like this workflow pattern, as there is consistency and cross-program compatibility, which made organising it easier. 

Saturday 21 April 2018

Lip Sync - Week 8

At the end of my animatic, Ivy says "Need a hug?". It's one of the only words spoken, so I attempted some lip syncing using this guide:


This lip sync worked better compared to the others:
The zombies said words like "hugs" and "itchy"

I wasn't sure if I should give them sharp teeth or keep them normal to make it clear what they are saying, I experimented and found sharp teeth works better:

Normal teeth

Sharp teeth


I also kept in mind what their mood was (happy/sad) while speaking, hence the "ITCHY" is  portrayed as sad/uncomfortable:


Friday 20 April 2018

Hug Zombie Character Design - Week 7

I doodled some ideas for other characters to become Hug Zombies.
They were meant to be regular characters, friends of Ivy's who live in the same neighbourhood.

Initially the Hug Zombie hoard was going to be the average adult. I reduced their age to be Ivy's age to make it less inappropriate.


What I liked:
  • The art style is a slightly more stylistic than my usual style; I'm am trying to develop a more consistent style
  • Each character has a basic shape for their heads and bodies, creating a range of unique characters.
What I didn't like:
  • How easily the characters fell into stereotypes


Storyboards - Week 6


What I liked:
  • The change in colour scheme as the story progressed
  • The transition from close up shots to long shots 


What could've worked better:

  • The ending might've been a bit too rushed
  • The close ups may be cliché

Thursday 19 April 2018

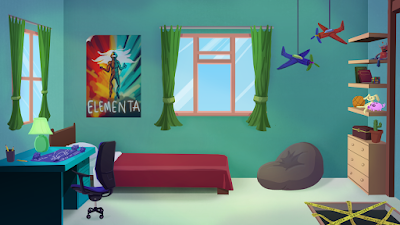
Room Design - Week 5


To add a few more details to Ivy's room in the attic, I used a reference of a friend's room for architectural ideas. Designing it in Maya helped me visualize it in a 3D space.


Painting over the Maya models on Photoshop to create backgrounds was useful. I learnt that Maya can be a very powerful pre-visualization tool, not just for animation.